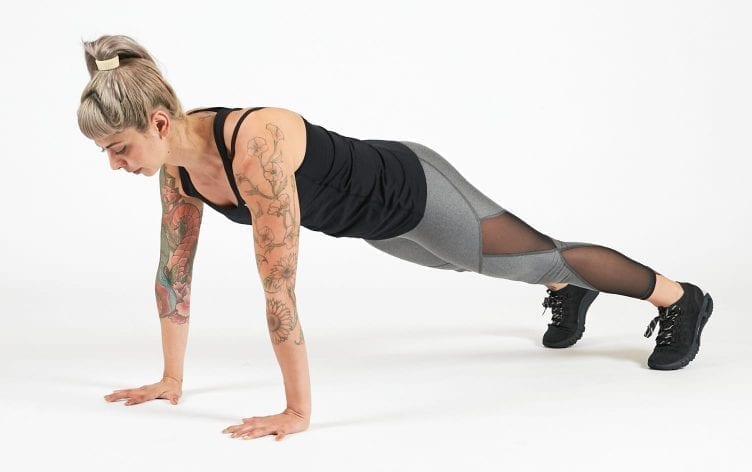
The Most Common Pushup Mistakes to Avoid

When it comes to bang-for-your-buck exercises, you can’t do much better than the classic pushup. All you need is your body weight and some free space on the floor to smoke your core, chest, back, arms and glutes.
Even if you can’t do full pushups (yet), you can still reap benefits by modifying the move to fit your current abilities. “Pushups are a great exercise for everyone regardless of fitness level,” says Chelsea Aguiar, a New York City-based personal trainer and founder of Athaya Fitness.
However, to reap the maximum strength-building benefits of pushups, you have to use proper pushup technique. Great pushup form enables you to perform the full movement efficiently, and ensures you use the muscles you’re supposed to use, which helps you make greater progress. “Efficiency of movement is what allows us to do more reps and even harder variations,” says Cori Lefkowith, a NASM-certified personal trainer and owner of Redefining Strength in Costa Mesa, California.
More importantly, prioritizing proper form lowers your risk of exercise-related pain and injury: “When our form isn’t correct, we tend to overwork muscles that aren’t meant to carry the loads we are asking them to handle,” Lefkowith says. When it comes to pushups, common pain and injury sites include the neck, shoulders, elbows and even lower back.
Here are five common pushup mistakes you might be making — and how to fix them.

The pushup is essentially a moving plank; you have to keep your body in a straight line as you lower down and push back up, Lefkowith says. But to pull this off, you need to keep your core engaged throughout the movement. If you don’t have enough core strength to maintain this plank position, chances are you compensate by sagging your hips toward the ground.
Sagging your hips may help you get through the movement, but it places a lot of extra pressure on your lower back. Not to mention, sagging your hips won’t help you build the core strength you need to progress in the exercise.
The Fix: Pay attention to what your hips are doing when you do pushups. “Make sure to keep your tailbone tucked and your hips are in line with your shoulders to avoid placing unnecessary pressure on the low back and to reap the full benefits of this exercise,” Aguiar says. If you can’t do a regular pushup without sagging your hips toward the floor, raise your hands on an elevated surface and build up to regular pushups. Elevate your hands as high as needed to perform the full movement in a plank position. Lower the incline as you gain strength.

“As with any exercise, the goal is to build strength throughout the entire range of motion for that specific movement,” Aguiar says. So, if you only lower your chest part-way to the ground during the pushup, you’ll only build strength within that limited range of motion.
The Fix: If you struggle to lower your chest to the ground with your legs straight, start with bent-knee pushups or elevate your hands, Aguiar says.

“The most common injury from pushups is pain or pinching in the front of the shoulder,” Aguiar says. This often happens when people flare their elbows too wide (making more of a T-shape with their bodies), or place their hands too far apart, as this shape puts more pressure on the shoulders and limits how much your chest and triceps contribute to the movement. “Generally, when our elbows flare out that much, our hands also turn in, which can place not only greater strain on the shoulder, but also the wrist and the elbow,” Lefkowith says.
The Fix: Set yourself up for success and place your hands on the floor directly under your shoulders. “The optimal position for a pushup is to keep the elbows 45 degrees from the body, creating an arrow shape,” Aguiar says.
Even if you can crank out regular pushups, consider starting with an incline pushup so you can really focus on creating an arrow shape with your body, Lefkowith says.

If you don’t have the core strength needed to maintain a plank position, you’ll either drop your hips toward the floor (see mistake #1), or you’ll push your butt into the air. “These compensations allow us to reduce the strain on our abs and change how much our upper body has to work,” Lefkowith says.
When you push your butt into the air, you shift the focus away from your chest and place more of the work on your shoulders, arms and upper traps. “This overuse of our shoulders may feel easier in the short-term, but can lead to rotator cuff issues, as well as wrist and elbow strain,” Lefkowith says.
The Fix: Think about engaging your core muscles before you begin the lowering portion of the pushup. Then, as you push back up, brace your abs, drive through your heels to flex your quads, and squeeze your glutes, Lefkowith says.
Regress to incline pushups if you can’t perform a regular pushup without lifting your butt in the air.

If you’ve ever strained your neck during pushups, or you feel like your nose is going to smash into the ground first during the lowering portion of the exercise, you’re likely jutting your head forward. “Whether it’s an attempt to make ourselves feel like we’re closer to the ground than we actually are, or we naturally have a slightly forward head posture, jutting your head forward during pushups is all too common,” Lefkowith says.
Common or not, it triggers you to engage the small muscles in your neck, which causes you to disengage other muscles that should be working. Not to mention, it puts extra stress on your neck.
The Fix: Keep your gaze slightly out in front of you during pushups; don’t strain to look up. “Think about almost creating a double chin as you do the pushup to keep your head in line,” Lefkowith says.
Also, think about creating tension from the ground. Try spreading your fingers and gripping the ground with your hand. “That tension can help you engage the correct muscles and help you avoid wrist and elbow issues,” Lefkowith says


